Afficher/cacher Sommaire
Aide-mémoire virsh
Répertorier les machines virtuelles en cours d’exécution
virsh list
Répertorier toutes les machines virtuelles
virsh list --all
Gestion état invité
Arrêt invité
virsh shutdown $VM_ID_OR_NAME
Démarrer invité
virsh start $VM_ID_OR_NAME
Redémarrer invité
virsh reboot $VM_ID_OR_NAME
Détruire invité
Cette commande est un arrêt intempestif, un peu comme si vous deviez couper l’alimentation d’un ordinateur. Vous devez l’utiliser si un invité ne répond plus. Il ne supprime pas l’invité. L’image disque restera et l’invité pourra être redémarré.
virsh destroy $VM_ID_OR_NAME
Suspension
La suspension est un moyen de “mettre en pause” immédiatement un invité afin qu’il n’utilise plus le processeur, le disque ou le réseau. Cependant, il continuera à résider dans la mémoire. Vous voudrez peut-être enregistrer/charger une session à la place, ce qui signifierait qu’elle ne prend plus de mémoire, mais n’est pas instantanée. afin qu’il ne consomme plus de mémoire et puisse être restauré dans son état exact (même après un redémarrage), il est nécessaire de sauvegarder et de restaurer l’invité.
Une session suspendue sera perdue si le système hôte est redémarré. Cependant, un invité enregistré persiste.
Suspendre l’invité
virsh suspend $VM_ID_OR_NAME
Reprendre l’invité
virsh resume $VM_ID_OR_NAME
Supprimer
virsh shutdown VM
virsh undefine VM
Définir
Définir un invité
Définir un invité permet de le démarrer à partir de son nom, plutôt que d’avoir à trouver son fichier XML et d’exécuter virsh create $name.xml. Cela signifie que les invités s’afficheront également dans virsh list --all lorsqu’ils seront arrêtés.
sudo virsh define filename.xml
Annuler la définition d’un invité
Afin d’utiliser à nouveau un nom pour un nouvel invité, vous devez dédéfinir l’ancien. Vous devez également supprimer son système de stockage.
sudo virsh undefine $VM_ID
Configuration de l’invité
Vous pouvez modifier manuellement le fichier de configuration xml de l’invité avec :
sudo virsh edit $VM_ID
Les modifications ne prendront effet qu’une fois l’invité redémarré
Variantes de système d’exploitation
Lors de la création d’un invité avec virt-install, vous devez spécifier la –os-variant. Pour obtenir une liste des valeurs acceptables (sur Ubuntu 16.04), installez le package libosinfo-bin avant d’exécuter la commande ci-dessous :
osinfo-query os
Renommer l’invité
virsh domrename $OLD_NAME $NEW_NAME
Vous ne pouvez le faire que lorsque l’invité n’est pas en cours d’exécution.
Démarrage invité au démarrage (démarrage automatique)
sudo virsh autostart $VM_ID
Pour désactiver le démarrage automatique de l’invité
sudo virsh autostart --disable $VM_ID
Redimensionner la mémoire
Exécutez la commande suivante pour afficher la configuration de l’invité.
sudo virsh edit $VM_ID
Modifiez les champs memory et currentMemory pour qu’ils correspondent à la taille souhaitée en KiB.
programster - kvm cheatsheet_004.png
Utilisez maintenant virsh pour arrêter et démarrer le conteneur afin que les modifications prennent effet.
Redimensionner la mémoire avec un script
VM_ID="my_vm_id"
NEW_AMOUNT="4000"

EDITOR='sed -i "s;[0-9]*</currentMemory>;$NEW_AMOUNT</currentMemory>;"' virsh edit $VM_ID
EDITOR='sed -i "s;[0-9]*</memory>;$NEW_AMOUNT</memory>;"' virsh edit $VM_ID

sudo virsh shutdown $VM_ID
sudo virsh start $VM_ID
N’utilisez pas virsh memtune. Voir ici pour plus de détails. Gestion du CPU Découvrir les paramètres d’ordonnancement du CPU
sudo virsh schedinfo $VM_ID
Définir de façon permanente les parts de CPU pour une instance en cours d’exécution en temps réel
sudo virsh schedinfo $VM_ID \
--set cpu_shares=[0-262144] \
--live \
--current \
--config
Obtenir les paramètres d’épinglage du CPU pour un invité
virsh vcpupin blog.programster.org
Exemple de sortie :
VCPU: CPU Affinity
----------------------------------
   0: 0-3
   1: 0-3
J’ai obtenu le résultat ci-dessus parce que j’ai donné à l’invité l’accès à 2 vCPUs mais je n’ai rien épinglé. Attacher un CPU
Si je voulais définir les cœurs qu’un invité peut utiliser, je pourrais faire ce qui suit :
virsh vcpupin blog.programster.org 0 2
Cela configurera le premier vCPU (celui avec l’ID 0) pour qu’il ne fonctionne que sur l’ID 2. Ainsi, la sortie de virsh vcpupin blog.programster.org devient.. :
VCPU: CPU Affinity
----------------------------------
   0: 2
   1: 0-3
L’épinglage pourrait être un excellent moyen de limiter l’effet d’un certain invité sur les autres, ou de donner à un invité un noyau dédié, etc.
Console de l’invité
Entrez dans la console de l’invité
sudo virsh console $VM_ID
Quitter la console de l’invité
Utilisez le raccourci clavier suivant (ce n’est pas une commande) :
Cntrl-]
Sauvegarder
Sauvegarder l’invité
virsh save $VM_ID $FILENAME
Charger l’invité
virsh restore $FILENAME
Le nom de fichier ici est le même fichier que celui dans lequel vous avez sauvegardé dans la commande précédente, et non pas un des autres fichiers invités !
Clone simple d’invité
virt-clone \
--original $VM_TO_CLONE \
--auto-clone \
--name $NEW_VM_NAME
Réseau
Liste des configurations réseau en cours d’exécution
virsh net-list
Liste de toutes les configurations réseau
virsh net-list --all
Vous pouvez trouver les configurations réseau stockées dans
/home/stuart/network-configs/.
Modifier une configuration réseau
sudo virsh net-list $NETWORK_NAME
Créer une configuration réseau temporaire
sudo virsh net-create --file $ABSOLUTE_FILE_PATH
Création d’une configuration réseau permanente
sudo virsh net-define --file $ABSOLUTE_FILE_PATH
Exemple de fichier de configuration réseau de la passerelle
<network>
  <name>examplebridge</name>
  <forward mode='route'/>
  <bridge name='kvmbr0' stp='on' delay='0'/>
  <ip address='192.168.1.1' netmask='255.255.255.0' />
</network>
Démarrer la configuration du réseau
sudo virsh net-start $NETWORK_ID
Activez le démarrage automatique du réseau
net-autostart --network $NETWORK_ID
Désactiver le démarrage automatique du réseau
net-autostart \
--network $NETWORK_ID \
--disable
Exemple de configuration manuelle du réseau avec un pont
Voici un exemple de fichier /etc/network/interfaces pour les utilisateurs d’Ubuntu.
# The loopback network interface
auto lo
iface lo inet loopback

# The primary network interface
auto p17p1
iface p17p1 inet manual

auto kvmbr0
iface kvmbr0 inet static
    address 192.168.1.19
    netmask 255.255.255.0
    network 192.168.1.0
    broadcast 192.168.1.255
    gateway 192.168.1.254
    bridge_ports p17p1
    bridge_stp off
    bridge_fd 0
    bridge_maxwait 0
Ici une version netplan :
# This file describes the network interfaces available on your system
# For more information, see netplan(5).
network:
  version: 2
  renderer: networkd
  ethernets:
    enp39s0:
      dhcp4: no
  bridges:
    kvmbr0:
      addresses: [ 192.168.1.186/24 ]
      gateway4: 192.168.1.1
      nameservers:
        addresses:
          - 8.8.8.8
          - 8.8.4.4
      interfaces:
        - enp39s0
Configurer la VM pour utiliser le pont manuel
Si vous avez configuré manuellement le pont avec la section ci-dessus plutôt qu’en utilisant les commandes virsh net, voici comment configurer les invités déployés pour l’utiliser :
sudo virsh edit $VM_ID
Trouvez la section suivante
    <interface type='network'>
      <mac address='52:54:00:4d:3a:bd'/>
      <source network=''/>
      <model type='virtio'/>
      <address type='pci' domain='0x0000' bus='0x00' slot='0x02' function='0x0'/>
    </interface>
Changez-le pour que ce soit comme ça :
    <interface type='bridge'>
        <mac address='52:54:00:4d:3a:bd'/>
        <source bridge='[bridge name here]'/>
        <model type='virtio'/>
        <address type='pci' domain='0x0000' bus='0x00' slot='0x02' function='0x0'/>
    </interface>
Maintenant, exécutez les deux commandes suivantes car les redémarrages ne fonctionnent pas.
sudo virsh shutdown $VM_ID
sudo virsh start $VM_ID
Ajouter une interface réseau à la VM
J’ai utilisé la commande ci-dessous pour ajouter une interface réseau à mon invité qui utilise l’interface pont de mon hôte appelée kvmbr1.
virsh attach-interface \
--domain guest1 \
--type bridge \
--source kvmbr1 \
--model virtio \
--config
Si votre invité est en cours d’exécution à ce moment-là, vous devez ajouter le paramètre –live.
Vous pouvez spécifier une adresse mac avec –mac mais sans cela, elle sera générée aléatoirement.
Snapshotting
How to Create KVM Virtual Machine Snapshot with Virsh Command
Créer un instantané interne
virsh snapshot-create $VM_ID
Vous pouvez prendre des instantanés des invités pendant qu’ils sont en cours d’exécution. Pendant que l’instantané est pris, l’invité est “mis en pause”. L’“état” de l’invité est également sauvegardé.
Créer un snapshot interne avec un nom
sudo virsh snapshot-create-as $VM_ID $SNAPSHOT_NAME
Créer un instantané interne avec un nom et une description
sudo virsh snapshot-create-as $VM_ID $SNAPSHOT_NAME $DESCRIPTION
Créer un instantané interne avec un nom et une description en utilisant un fichier
Si vous aimez écrire du xml, vous pouvez créer un fichier comme celui-ci :
<domainsnapshot>
    <name>Name for the snapshot</name>
    <description>Description for the snapshot</description>
</domainsnapshot>
… puis le passer à virsh snapshot-create pour créer le snapshot
virsh snapshot-create $VM_ID $FILEPATH
Créer un snapshot externe
Lister les snapshots
sudo virsh snapshot-list $VM_ID
Par défaut, la liste des instantanés est classée par ordre alphabétique plutôt que chronologique. Si vous voulez savoir quels sont vos derniers snapshots, vous pouvez ajouter les paramètres optionnels
--treeou--leaves.
Restaurer un instantané
virsh snapshot-revert $VM_ID $SNAPSHOT_NAME
Supprimer un instantané
virsh snapshot-delete $VM_ID $SNAPSHOT_NAME
D’autres fonctionnalités de snapshot sont disponibles dans Qcow2 Conversion and Snapshotting
Modifier un instantané
Si vous utilisez virsh avec des snapshots internes qcow2 et que vous décidez de déplacer le fichier vers un autre emplacement, vous ne pourrez pas restaurer ces snapshots. Ceci est facilement résolu en éditant les snapshots et en mettant à jour le chemin du fichier.
sudo virsh snapshot-edt $VM_ID_OR_NAME $NAME_OF_SNAPSHOT
Instantané (snapshot)
Créer un instantané (snapshot)
Sur des hyperviseurs basés sur KVM, nous pouvons prendre des machines virtuelles ou un instantané de domaine à l’aide de la commande virsh.
Toutes les commandes seront exécutées en mode su : sudo -s
Nous ne pouvons prendre l’instantané que des machines virtuelles dont le format de disque est Qcow2 et le format de disque brut n’est pas pris en charge par la commande kvm virsh, utilisez la commande ci-dessous pour convertir le format de disque brut en qcow2
qemu-img convert -f raw -O qcow2 image-name.img image-name.qcow2
On se rend dans le répertoire
cd ~/virtuel/KVM/
Répertorier toutes les machines virtuelles sur l’hyperviseur
virsh list --all

Créer un instantané de la machine virtuelle KVM (yunobulls)
virsh snapshot-create-as --domain yunobulls --name yunobulls_20220625 --description "snap yunohost 25-06-2022"
Une fois l’instantané créé, répertorier les instantanés liés à la machine virtuelle
virsh snapshot-list yunobulls

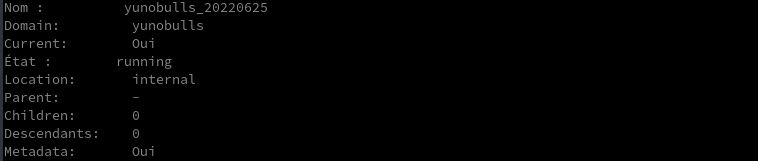
Pour répertorier les informations détaillées de l’instantané de la VM
virsh snapshot-info --domain yunobulls --snapshotname yunobulls_20220625
Rétablir/Restaurer la machine virtuelle KVM
Supposons que nous voulions rétablir ou restaurer la machine virtuelle yunohost sur l’instantané yunobulls_20220625
virsh snapshot-revert yunobulls yunobulls_20220625
Supprimer les instantanés
Pour supprimer des instantanés de machine virtuelle KVM, obtenez d’abord les détails de l’instantané de la machine virtuelle à l’aide de la commande virsh snapshot-list, puis utilisez la commande virsh snapshot-delete pour supprimer l’instantané.
virsh snapshot-list yunobulls
virsh snapshot-delete --domain yunobulls --snapshotname yunobulls_20220625
Liens
- Managing KVM on RHEL 6 using the virsh Command-line Tool
- Red Hat Docs - Chapter 20. Managing guests with virsh
- Libvirt Docs - net-create
- Libvirt Docs - net-define
- Ubuntu Docs - KVM/Managing
- virt-clone(1) - Linux man page
- IBM - Working with libvirt cgroups
- Libvirt - memtune
- Using CGroups with libvirt and LXC/KVM guests in Fedora 12
- KVM - Changing Memory of Guests Live
- Stack Overflow - Changing the dhcp IP range in Virbr0’s XML file using virsh in bash script
- Nixcraft - KVM: Start a Virtual Machine / Guest At Boot Time
- Nixcraft - How to rename KVM virtual machine (VM) domain with virsh command
- Redhat Docs - 8.3 LIBVIRT NUMA TUNING
- How to Create and Manage KVM Virtual Machines via Command Line